Nail art for Long Nails
Hello World,
For the ones with long nails, this post is for you ladies. I hope you guys are taking proper care of them by cleaning and scrubbing them often regularly. For scrubbing your nails, I have provided my suggestions in one of my previous posts. Refer to the comment section of the post FAQs. For further query comment below. The nail art tutorial for long nails is as follows:
Things needed:
1. Nail Paints: White, Black and Pink.
2. Toothpicks
3. Top coat
4. Q-Tips
5. Nail paint remover
I have short nails so I'll be using nail extensions. I often prefer nail arts on nail extensions rather than going for gels or acrylic. I'll be posting more about them in detail soon.


Here is the summary of the nail art tutorial explained above.

For the ones with long nails, this post is for you ladies. I hope you guys are taking proper care of them by cleaning and scrubbing them often regularly. For scrubbing your nails, I have provided my suggestions in one of my previous posts. Refer to the comment section of the post FAQs. For further query comment below. The nail art tutorial for long nails is as follows:
Things needed:
1. Nail Paints: White, Black and Pink.
2. Toothpicks
3. Top coat
4. Q-Tips
5. Nail paint remover
 |
Optional step: Nail extensions were applied with the help of double sided nail glue sticker. Then using a nail cutter and file, I gave them a shape of a pipe. The nailart which I am going to do needs space, so nails in shape of a pipe, rounded or oval shall be convenient. If you have square nails, you can still give a try.
 |
| Nail Extensions (Before) |
Cutting of a Nail
Shaping the nails (Pipe)
 |
| Nail Extensions (After) |
Step 1: Paint your nails white.

Step 2: Draw an outline of a glass using toothpick and pink nail paint. When drawing the top line extend the line a little bit.

Step 3: Fill the glass with strawberry frappuccino, kidding I mean pink colour nail paint. 😂

Step 4: Draw mini mouse's head outline using a toothpick and black nail paint. To make this step easy I would suggest you to use black gel pen for drawing. In case of errors, you can wash it off with water that's the best part.

Step 5: Now fill the head with black nail paint. You can use a brush or toothpick according to your convenience. At this step you can give a fairy touch to the pink section by using Nykaa Unicorn Potion- Pink Pony. It is optional you can proceed without this too.

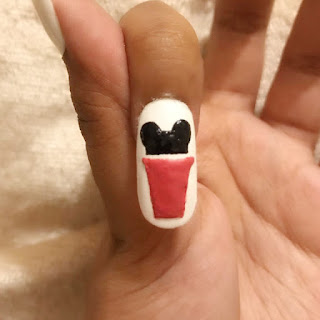
Step 6: Next, place a white dot over the pink section as shown in the picture below:

Step 7: After the white dot dries completely. Draw mini's face using a toothpick and black nail paint. For this put one medium size dot at middle and two small dots side by side, as shown in the picture the picture below. Draw a straw, you can use the thread method which I had explained in the previous post.

Let the nail art dry, apply top coat and clean the edges if any mess made using a Q-tip and nail remover. Your nail art is done. You can repeat these steps for other nails too. I didn't had time so I decided not to do same for other nails. Instead I made a big mini's face on my middle finger and painted rest with the unicorn potion. Nykaa's unicorn potions are bit transparent, you would need 2-3 applications for perfect visibility. I had already painted my nails white, so I just had to apply one coat of pink pony.
 |
| Nail art on Middle Finger |
 |
| Final Look |

P.s. 1: This nailart is inspired from a post in pinterest (unknown artist). I have been binge watching cartoons on disney plus hotstar (guilty pleasure) so I decided to go for a disney nail art.
P.s. 2: I hope you guys like it, let me know in the comment section below. Try it out and do send me the pictures, I'll post my favourites on my facebook, whatsapp, and snapchat stories.
Tips:
1. For the 6th step, you can use a toothpick and a small pearl. Stick the pointed end of the toothpick into the pearl and let it dry. Your own dotting tool is ready, you can use this for long. You can make similar ones using different sizes of pearls. After using the tool, make sure to clean it using a nail paint remover.
2. For nail arts white and black nail paints are must. Do buy if you don't have them now, once the lockdown is over. Always buy a good transparent nail polish (top coat), others can be of satisfactory quality. A good top coat can fix every imperfection.
Thankyou,
Take Care and Be Safe.
Keep Reading.
Comments
Post a Comment