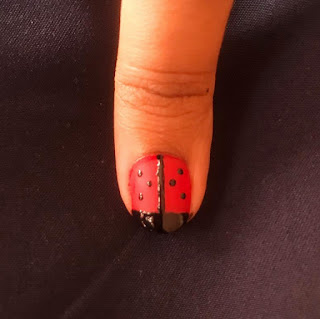
Nail art for short nails.
Greetings of the day,
Hello gorgeous ladies,
I apologize for not posting last week. My laptop was throwing tantrums even more than me.😛Here's the compensation, I will be posting two nail art tutorials today. To begin I shall start with nail art tutorial for short nails. Tools have been used keeping in mind that most wouldn't have a nail art kit and obviously cannot purchase one at the moment.
Things needed:
1. Nail Paint: Red, White and Black.
2. Toothpick be it wooden or plastic
3. Q-tip
4. Top coat be it glossy or matte
5. Nail paint remover
Step 1: Paint your nails RED..!! 😍
Step 2: Next, paint your nail tips black, slightly broader. You can first draw a straight line using a toothpick and then paint the tips for a neat look. Make sure you use a toothpick which is pointed enough as shown in the picture below.
Step 3: Draw a straight line at middle of your nail using a toothpick with a black nail paint, as shown below.
Step 6: YES, YOU ARE RIGHT..!! We are making small bugs on our nails, so let's give them their eyes. Taking tiny drop of black nail paint and placing it carefully over the white dot. After this let your nail art dry completely and then only apply top coat. Next, dip the Q-tip into acetone and then use it as a nail paint remover pen to rectify all the mess created outside your nail .Your cute-little bugs are ready to be flaunted. 🐞
Hello gorgeous ladies,
I apologize for not posting last week. My laptop was throwing tantrums even more than me.😛Here's the compensation, I will be posting two nail art tutorials today. To begin I shall start with nail art tutorial for short nails. Tools have been used keeping in mind that most wouldn't have a nail art kit and obviously cannot purchase one at the moment.
Things needed:
1. Nail Paint: Red, White and Black.
2. Toothpick be it wooden or plastic
3. Q-tip
4. Top coat be it glossy or matte
5. Nail paint remover
 |
 |
 |
 |
Step 4: Next, take little amount of black nail paint and make dots in the same pattern as shown below.
 |
 |
Step 5: Taking the same amount of white nail paint on the toothpick, make two dots as shown in the picture below. Make sure whenever you use a different color, use a fresh toothpick.
 |
Tips:
1. If don't have a red nail paint, don't be sad you can still try this nail art using green, orange or a maroon nail paint.
2. If you don't have toothpicks at home, you can use a sharp pencil.
3. To make straight lines you can use a thread, just paint a small section of the thread and stamp on the desired part of the nail. If you find it difficult, ask someone else to stamp for you.
4. You can also use push pins or a safety pin while making eyes of the bug.
P.s. Remember the nail paints should dry completely and then only you should proceed with the next step orelse you would regret. I hope you guys like it and try it home. 💖
Stay gorgeous. Keep Reading.


That's awesome can't waot to try it on myself 😍
ReplyDeleteThankyou Eshani :* :*
DeleteWow 💯🤩
ReplyDeleteThankyouuu
Delete